Secret is like sending some encoded data to the Pod. Once the data reaches the Pod, it decodes inside. Like with a configMap, there are two ways of creating Secret.
- from literal : kubectl create secret generic <secret name> –from-literal=<set of key values pairs, separated by commas> (generic is a keyword for creating secret)
- from file : kubectl create secret generic <secret name> –from-file=<full name of the file> (generic is a keyword for creating secret)
when showing the output of a command kubectl describe secret <secret name>, Kubernetes does not disclose the values, and not even encoded text, shows number of bytes instead. When generating yaml script performing the command (through –dry-run parameter), encoded data will be shown. For encoding data, base64 algorithm is used.
Example of submitting secret to a Pod via volumes is here. Via environment variable – here. Inside the Pod, data will be saved in decoded format.
Some more about Services concept. Besides ClusterIP and NodePort types of Services, there are LoadBalaner and Headless Service Types. Here is an example of creating LoadBalancer yaml script. Like NodePort service type, LoadBalancer creates NodePort along with ServicePort, but, unlike NodePort service type, leaves its External-IP in pending status when just being created. Eventually LoadBalancer service assigns External-IP, depending upon the state of the Cluster. Under the hood, Load Balancer is created for managing this assigning Externap-IP. This External-IP will be used for accessing pods from outside (not Master or Node IPs, like with a NodePort service type). LoadBalancer works only in cloud environment.
Headless Service is helpful when all requests should be sent to one Pod only. In other words, requests don’t need to be load balanced. It is common for stateful session based applications. Example of yaml script for Headless Service is here. No Cluster-IP address is assigned to Headless Service, unlike in normal Service. This is because Headless Service sends request directly to Pod, it does not work on a Cluster level.
kubectl run –rm <pod name> -it –image <image name> <used command shell (bash, for example)> – command, which is an alternate way to create and run the Pod, entering in an interactive mode (–rm parameter means delete the Pod after exiting from interactive mode)
nslookup command applied to Headless Service (nslookup <headless service name>) does not return Cluster ip address, it returns pods ip addresses.
StatefulSets is another way of providing data storage in Kubernetes. Using Stateful Sets allows to achieve 3 goals :
- save pods names (even if pod is deleted and later created, its name will remain the same)
- avoid load balancing
- replicate data between pods volumes
Since StatefulSets aim to avoid load balancing, they only deal with Headless services. StatefulSets are like Deployments, but in StatefulSets pods are created sequentially, one after another, in chronological order. If a Pod in a StatefulSet is deleted, another Pod will be created with the same name. And if replicas number is scaled to reduce, replicas are gone beginning from the last, in back order. Besides in StatefulSet one of the pods is assigned to be Master Pod, whereas others are assigned as Slave Pods, and data is copied between them. In StatefulSets every Pod maintains its own volume. Whenever a new Pod gets created, a new volume comes into the picture. Here is an example of yaml script, creating StatefulSet for Redis database. Reminder: StatefulSet should always be created with Headless Service, Service definition should be a part of StetafulSet, if not, it doesn’t work. In yaml script above, there is volumeClaimTemplates parameter, it is for creating Persistent Volumes for every Pod. Yes, for each Pod StatefulSet creates Persistent Volume.
Ingress, HPA
Imagine, there are 3 microservices in one application (let’s say, amazon has three applications : shop, videos, flights), and each microservice is executed as container, i.e. each microservice has its separate image. In this case, 3 different services should be created for each deployment. Every Service contains its name, ip, port number, target port number. Every Service is accessible via Master ip/Node ip:NodePort. And there will be 3 Load Balancers (1 for each Service). How to route request for proper service, depending on URL (for example, www.amazon.com/shop, www.amazin.com/videos, www.amazon.com/flights) ? That is where Ingress comes into the picture. It works as a Load Balancer. Multiple services can be set up under one Ingress, and user will access only Ingress. Ingress forwards requests to multiple services. See picture :
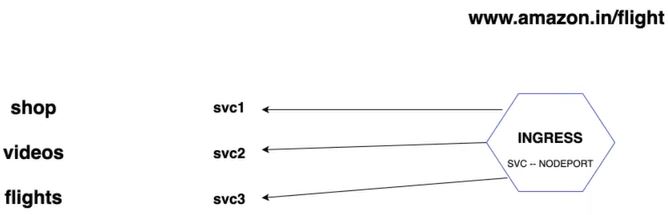
Ingress comprises the work of multiple Load Balancers, eliminating the need to create Load Balancer for each Service. Ingress is often created in a separate namespace. Here is Ingress related information (carefully look through README.md). ingress-rule.yml defines mapping of URLs to services. One Ingress per Kubernetes Cluster is enough. Thus, the sequence is : Ingress accepts request from outside world, then exposes requests to services within the Cluster following the rules defined on the Ingress resource, then services deliver requests to pods.
HPA stands for Horizontal Pod Autoscaler. This is a Controller (like RC, RS etc). Here is yaml script including declaring HPA (in the bottom). HPA scales an application depending on condition, which is defined in the script (targetCPUUtilizationPercentage, for example). See below :
apiVersion: autoscaling/v1
kind: HorizontalPodAutoscaler
metadata:
  name: nginx-hpa
spec:
  scaleTargetRef:
    apiVersion: apps/v1
    kind: Deployment
    name: nginx
  minReplicas: 2
  maxReplicas: 10
  targetCPUUtilizationPercentage: 20
HorizontalPodAutoscaler called nginx-hpa observes targetCPUUtilizationPercentage (how much CPU Pod consumes). When it reaches 20 percent, HPA requests Deployment it is applied to (Deployment called nginx in this case) to spawn new replicas up to 10 to lower CPU utilization of the Pod. When CPU utilization lowers down, the number of replicas goes down accordingly.
How to increase the load (CPU utilization) ? Number of requests to application have to be significantly increased. It can be done via using apache benchmark utility (watch Test the HPA using apache bench here).